---
title: Snapped percentage options
---
Snapped percentage options are a hybrid between [list options][list] and
[percentage options][pct]. By combining traits of both, they create a
sort of _smart list option_ that will select the most appropriate value
from the list, and also allow a pure parametric value if no close match
is found.
## Structure
Your snapped percentage option should be a plain object with these properties:
- `pct` : The default percentage
- `min` : The minimum percentage that's allowed
- `max` : The maximum percentage that's allowed
- `snap`: Holds the snap configuration (see [Snap configuration](#))
- `toAbs`: a method returning the **millimeter value** of the option ([see `toAbs()`][toabs])
- `hide` (optional) : A method to [control the optional display of the option][hide]
## Snap configuration
A snapped percentage option requires a `snap` property that will determine
what values to snap to.
There are three different scenarios:
### snap holds a number
When `snap` holds a number, the option will be _snapped_ to a
multiple of this value.
In the example below, the absolute value of this option will be set to a multiple of `7`
(so one of `7`, `14`, `21`, `28`, `35`, ...).
```js
myOption: {
pct:5,
min: 0
max: 35,
snap: 7,
toAbs: (pct, { measurements }) => measurements.waistToFloor * pct
}
```
In a case like this, the value will **always** be snapped,
because the snap points will be distributed equally across the entire range
of all possible inputs.
### snap holds an array of numbers
When snap holds an array of numbers, the option will be _snapped_ to one of
the numbers unless it's further away than half the distance to its closest neighbor.
In the example below, if the absolute value returned by `toAbs()` is in the
region of influence -- in this example between 4.5 and 69.5 -- the nearest snap value
will be used. If instead it is outside the region of influence, the result of
`toAbs()` will be uses as-is.
```js
myOption: {
pct:5,
min: 0
max: 35,
snap: [7, 12, 21, 34, 53, 64 ]
toAbs: (pct, { measurements }) => measurements.waistToFloor * pct
}
```
### snap is a plain object with `metric` and `imperial` properties that each hold an array of numbers
In this case, the behavior is exaxtle the same as when `snap` holds an array
of numbers.
The differnce is that this allows you to supply a different list of snap values
for users using metric or imperial units.
In the example below, the value of [settings.units](/api/settings/units) will
determine which list of snap values gets used.
Then, if the absolute value returned by `toAbs()` is in the
region of influence -- in this example between 4.5 and 69.5 -- the nearest snap value
will be used. If instead it is outside the region of influence, the result of
`toAbs()` will be uses as-is.
```js
myOption: {
pct:5,
min: 0
max: 35,
snap: {
metric: [7, 12, 21, 34, 53, 64 ],
imperial: [25.4, 50.8, 76.3 ],
}
}
```
##### Read on for an in-depth look at snapped percentage options
While this information above tells you how to use snapped percentage options,
it does not explain why or when you should use them, or how they work.
Read on if you'd like to learn more about that.
## Example use-case
To understand the need that snapped percentage options are addressing,
we'll use an example use-case: We'll be designing a pajama pants pattern
with an elasticated waist.
In our design, the `waistbandWidth` option should match the width of the
elastic we're going to use so we can construct the waistband accordingly.
We have a few different ways we can approach this:
### Approach A: We use a percentage option
We use a percentage option based on a vertical measurement, like
`waistToFloor`.
The elastic width people end up with is something like 34.12mm for
user A and 27.83mm for user B.
Those are not widths for sale in the store, so that's not great.
### Approach B: We use a list option
We use a list option with a selection of standard elastic
widths to choose from: from half and inch to 3 inches
in 0.5 inch increments.
User A is a doll enthusiasts and 0.5 inch is too big.
User B is working on a giant to go on a float in a parade, and 3 inch
is way too small.
While it would probably work for most people somewhat in the middle,
our solution does not scale.
### Approach C: We use a snapped percentage option
We combine approaches A and B and configure a snapped percentage option
with:
- A percentage based on `waistToFloor`
- Our list of standard elastic widths as _snaps_
For typical humans, our options will _snap_ to the closest match in our
list and behave just like Approach A (with a list option).
For dolls and giants, the option will revert to the parametric value and
behave just like Approach B (with a percentage option).
Sweet!
## How snapped percentage options work
Before we wade into the details, let's first agree on terminology:
- The **percentage value** is the page passed by the user for the option.
Its value always represents a percentage.
- The **millimeter value** is the result of feeding the **percentage value** to
the `toAbs()` method. Its value always represents millimeters.
- The **snap values** are the values provided by the snap confguration.
Each of the values always represents millimeters.
Under the hood, and snapped percentage option will:
- Use `toAbs()` to calculate the **millimeter value** from the **percentage value**
- See whether the **millimeter value** approaches one of the **snap values**
- If so, use the snap value (in millimeter) as provided by one of the **snap values**
- If not, use the **millimeter value** as-is
If you're head's spinning, here's an image that will hopefully clarify things a bit:
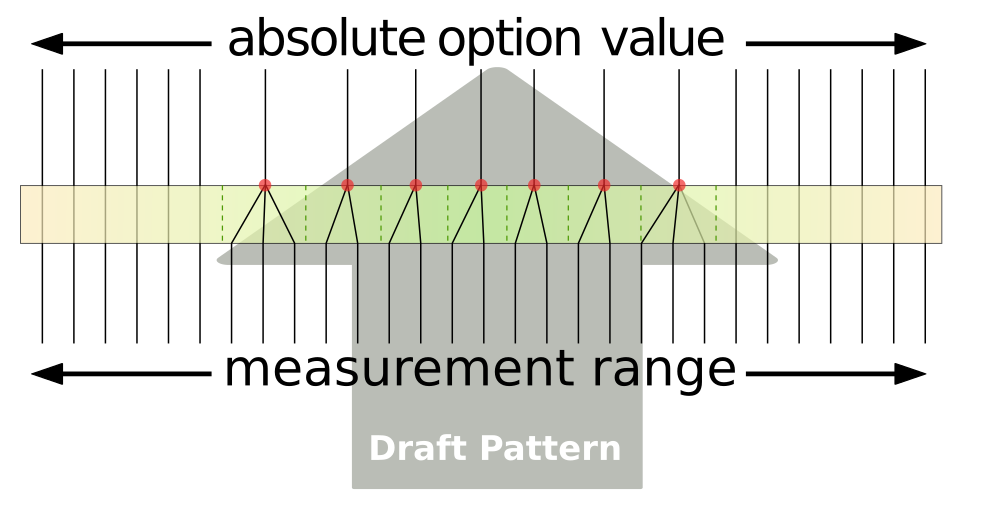
The gradient box represents the range of any given measurement,
from dolls all the way on the left, to giants all the way on the right.
The sort of middle green-colored region is what the designer had in mind
when designing the pattern, and they have set up snap values -- marked by
a red dot -- for values that they feel make sense.
The region of influence of any given snap point will extend 50% towards its
neighbor on both sides (indicated by the dashed lines).This means that the
region of snap points is continuous, once you're in, you're going to be
snapped to one of the snap points.
However, when you venture out into the area where the designer did not
configure any snap points, the absolute value will be used as-is, without
snapping, just as it would in a normal percentage option.
This system results in the best of both worlds:
- Things like elastic widths and so on can be configured to be fixed values,
of common elastic widths for example
- The absolute value will still scale up and down, but will snap to the closest
fixed value when appropriate.
- When the input measurements go somewhere the designer did not anticipate,
the option will just behave as a regular percentage option
## Using snapped percentage options in your pattern code
This is all well and good, but how do you use this?
Well, just like you can get the `options` object from our shorthand call,
you can now get the `absoluteOptions` object that holds absolute values
for those options with snaps configured.
In our paco example, what used to be:
```js
store.set('ankleElastic', measurements.waistToFloor * options.ankleElastic)
```
is now:
```js
store.set('ankleElastic', absoluteOptions.ankleElastic)
```
There's really no added value in setting this in the store as `absoluteOptions`
is available everywhere, but we've changed as little as possible in the example
to clarify the difference.
[toabs]: /reference/api/config/options/pct/toabs
[pct]: /reference/api/config/options/pct
[list]: /reference/api/config/options/list
[hide]: /reference/api/config/options#optionally-hide-options-by-configuring-a-hide-method