336 lines
13 KiB
Text
336 lines
13 KiB
Text
---
|
|
title: FreeSewing Editor
|
|
---
|
|
|
|
import {
|
|
OptionsIcon,
|
|
MeasurementsIcon,
|
|
BeakerIcon,
|
|
GaugeIcon,
|
|
PrintIcon,
|
|
SaveIcon,
|
|
ExportIcon,
|
|
EditIcon,
|
|
ListIcon,
|
|
XrayIcon,
|
|
DocsIcon,
|
|
DesignIcon,
|
|
UiIcon,
|
|
BackIcon,
|
|
} from '@freesewing/react/components/Icon'
|
|
import DraftView from '@site/docs/docs/editor/views/draft/readme.mdx'
|
|
import DesignsView from '@site/docs/docs/editor/views/designs/readme.mdx'
|
|
import SaveView from '@site/docs/docs/editor/views/save/readme.mdx'
|
|
import ExportView from '@site/docs/docs/editor/views/export/readme.mdx'
|
|
import MeasurementsView from '@site/docs/docs/editor/views/measurements/readme.mdx'
|
|
import UndosView from '@site/docs/docs/editor/views/undos/readme.mdx'
|
|
import LayoutView from '@site/docs/docs/editor/views/layout/readme.mdx'
|
|
import DocsView from '@site/docs/docs/editor/views/docs/readme.mdx'
|
|
import EditSettingsView from '@site/docs/docs/editor/views/editsettings/readme.mdx'
|
|
import InspectView from '@site/docs/docs/editor/views/inspect/readme.mdx'
|
|
import LogsView from '@site/docs/docs/editor/views/logs/readme.mdx'
|
|
import TestView from '@site/docs/docs/editor/views/test/readme.mdx'
|
|
import TimingView from '@site/docs/docs/editor/views/timing/readme.mdx'
|
|
import PickerView from '@site/docs/docs/editor/views/picker/readme.mdx'
|
|
|
|
import PreferencesMenu from '@site/docs/docs/editor/menus/preferences/readme.mdx'
|
|
import OptionsMenu from '@site/docs/docs/editor/menus/options/readme.mdx'
|
|
import SettingsMenu from '@site/docs/docs/editor/menus/settings/readme.mdx'
|
|
import ViewMenu from '@site/docs/docs/editor/menus/view/readme.mdx'
|
|
import FlagsMenu from '@site/docs/docs/editor/menus/flags/readme.mdx'
|
|
import TestMenu from '@site/docs/docs/editor/menus/test/readme.mdx'
|
|
import LayoutMenu from '@site/docs/docs/editor/menus/layout/readme.mdx'
|
|
|
|
Generating custom sewing patterns based on your measurements is the flagship
|
|
feature of our website. As a user, the way to tap into that feature is by
|
|
using the **FreeSewing Editor**.
|
|
|
|
This page is the definitive guide to using the FreeSewing Editor.
|
|
|
|
## Before you start
|
|
|
|
Before we dive in, you should know that:
|
|
|
|
- The home of the FreeSewing Editor is
|
|
[freesewing.eu/editor](https://freesewing.eu/editor/).
|
|
- The editor stores your pattern settings in the URL, so you can bookmark or share the URL with others.
|
|
- The editor has different areas, views, and menus which are all explained here.<br />
|
|
- By default, some of the more advanced features of the Editor are hidden to not overwhelm new users.
|
|
|
|
:::tip
|
|
To gain access to all Editor features, set your [User Experience](/account/preferences/control/)
|
|
to level **4** which is what we used in our examples.
|
|
:::
|
|
|
|
## Quick start guide
|
|
|
|
To hit the ground running, following these 3 steps:
|
|
|
|
1. [Choose a design](#1-choose-a-design)
|
|
2. [Provide measurements](#2-provide-measurements)
|
|
3. [Get to work](#3-get-to-work)
|
|
|
|
### 1. Choose a design
|
|
|
|
The first thing the Editor needs to know is what design to load. If you have
|
|
not picked a design yet, then opening the editor will automatically load [the
|
|
designs view](#designs) which lets you select a design from [the FreeSewing
|
|
collection](/designs/).
|
|
|
|
### 2. Provide measurements
|
|
|
|
Assuming the design you chose requires measurements -- almost all designs do,
|
|
but some do not -- the Editor will load [the measurements view](#measurements).
|
|
|
|
As long as required measurements or missing, the Editor will not load any other view but
|
|
[the measurements view](#measurements), or [the designs view](#designs) to
|
|
choose a different design.
|
|
|
|
Refer to [the measurements view](#measurements) for all details on how you can provide measurements, but there's one thing to note about this view: The drop-down at the top that says **Pattern Measurements**. This is [the view menu](#views) and it is present on every view except [the designs view](#designs) since all other views require a design to be chosen first.
|
|
|
|
### 3. Get to work
|
|
|
|
Once you have provided all required measurments, you are ready to go to work,
|
|
which typically starts with loading [the draft view](#draft).
|
|
|
|
## Editor Areas {#areas}
|
|
|
|
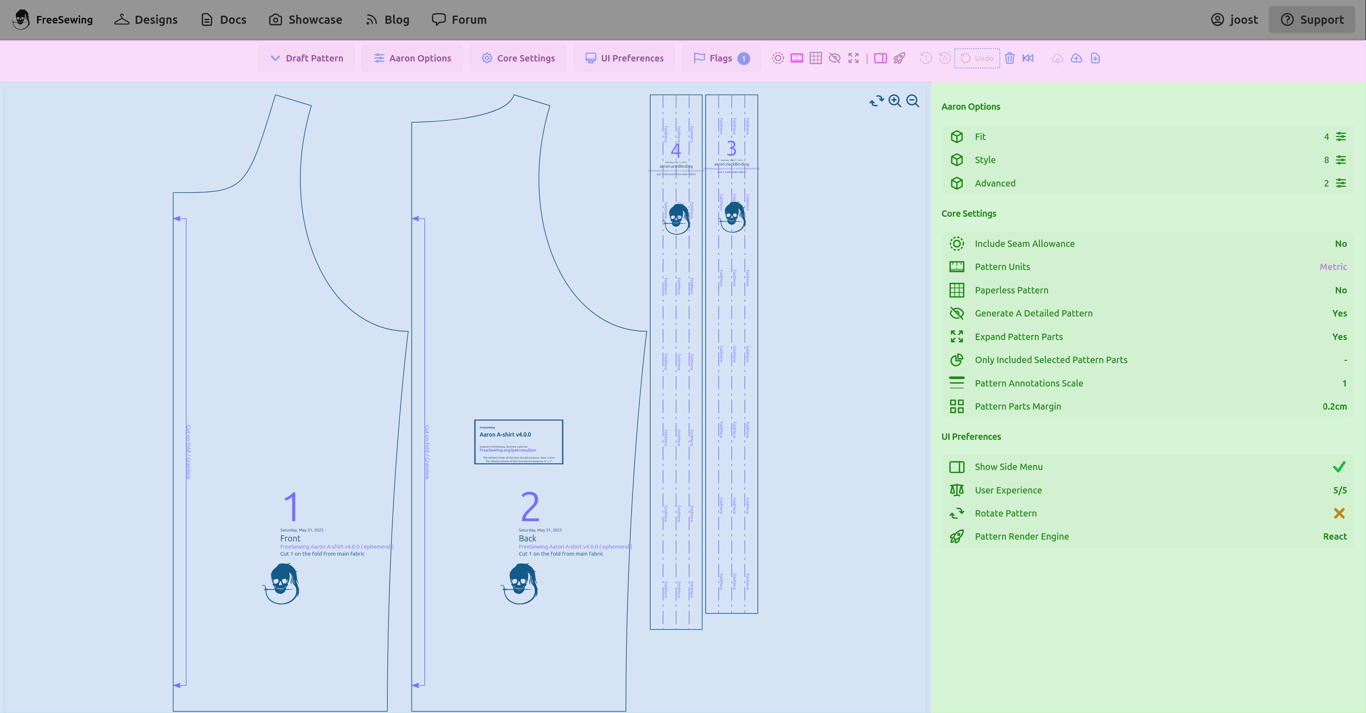
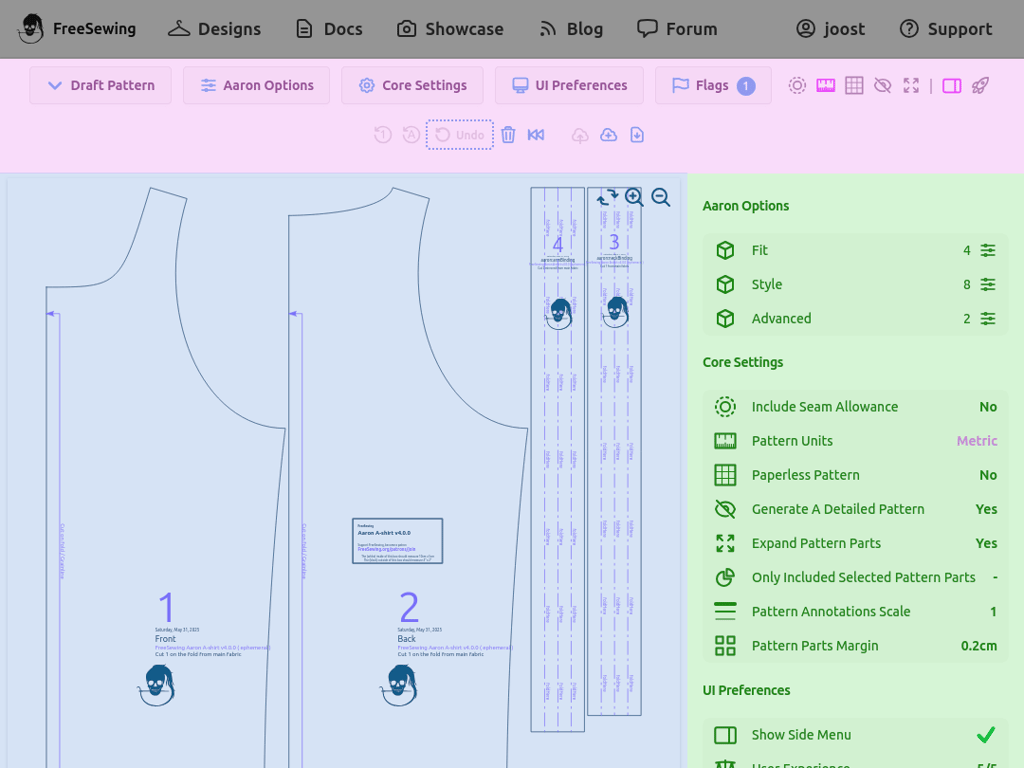
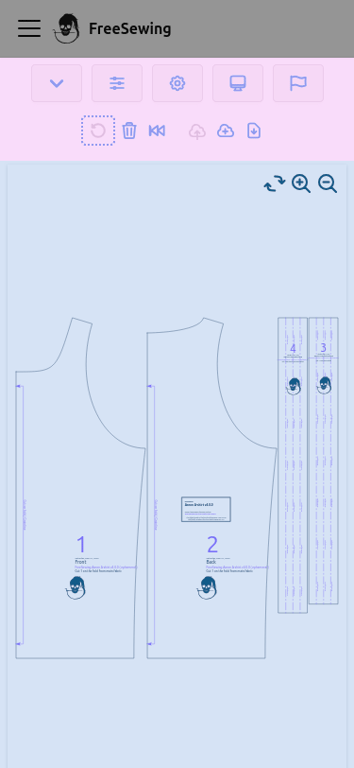
The Editor has different areas, which are colorized in the screenshots below:
|
|
|
|
- The **gray** top of the screenshot is the navbar of the FreeSewing website,
|
|
and is not part of the editor. We include it in the screenshots so that
|
|
things look the same on your screen, but it is **not an editor area**.
|
|
- The **pink** horizontal strip at the top is the **ribbon area** where all
|
|
menus are placed. The actual contents of this area will differ based on the
|
|
view, but this area is present all all views with the exception of [the
|
|
designs view](#designs)
|
|
- The **blue** and **green** areas below the ping strip at the top represent the
|
|
**main working area**. For many views, this will be a single area. But for
|
|
some views, like [the draft view](#draft) shown in the screenshot below, this
|
|
area is further divided:
|
|
- Marked in **blue** is the **pattern area** where you can see your pattern.<br />
|
|
<small className="tw:pl-4">
|
|
Note that this area has different pan & scroll behaviour. To scroll the entire page, make sure
|
|
to do so outside this area.
|
|
</small>
|
|
- Marked in **green** is the **aside area**, which allows you to (also) have the menus on the side.
|
|
This is optional as these menus are also available in the ribbon area.
|
|
|
|
<Tabs>
|
|
<TabItem value="desktop" label="On Desktop">
|
|
|
|
<div className="tw:text-center">
|
|
_A screenshot showing colorized FreeSewing Editor areas (in draft view, on a desktop)._
|
|
</div>
|
|
</TabItem>
|
|
<TabItem value="tablet" label="On Tablet">
|
|
|
|
<div className="tw:text-center">
|
|
_A screenshot showing colorized FreeSewing Editor areas (in draft view, on a tablet)._
|
|
</div>
|
|
</TabItem>
|
|
<TabItem value="mobile" label="On Mobile">
|
|
|
|
<div className="tw:text-center">
|
|
_A screenshot showing colorized FreeSewing Editor areas (in draft view, on mobile)._
|
|
</div>
|
|
</TabItem>
|
|
</Tabs>
|
|
|
|
## Editor Views
|
|
|
|
The editor supports different **views** where each view serves a different purpose.
|
|
The following views are available:
|
|
|
|
<a className="tw:flex tw:flex-row tw:pl-4 tw:items-center" href="#draft">
|
|
<OptionsIcon className="tw:w-5 tw:h-5" />
|
|
<span className="tw:pl-2">Draft Pattern</span>
|
|
<span className="tw:pl-4 tw:text-sm tw:text-base-content">
|
|
aka <b>draft</b> view
|
|
</span>
|
|
</a>
|
|
<a className="tw:flex tw:flex-row tw:pl-4 tw:items-center" href="#designs">
|
|
<DesignIcon className="tw:w-5 tw:h-5" />
|
|
<span className="tw:pl-2">Choose a different design</span>
|
|
<span className="tw:pl-4 tw:text-sm tw:text-base-content">
|
|
aka <b>designs</b> view
|
|
</span>
|
|
</a>
|
|
<a className="tw:flex tw:flex-row tw:pl-4 tw:items-center" href="#save">
|
|
<SaveIcon className="tw:w-5 tw:h-5" />
|
|
<span className="tw:pl-2">Save pattern as...</span>
|
|
<span className="tw:pl-4 tw:text-sm tw:text-base-content">
|
|
aka <b>save</b> view
|
|
</span>
|
|
</a>
|
|
<a className="tw:flex tw:flex-row tw:pl-4 tw:items-center" href="#export">
|
|
<ExportIcon className="tw:w-5 tw:h-5" />
|
|
<span className="tw:pl-2">Export Pattern</span>
|
|
<span className="tw:pl-4 tw:text-sm tw:text-base-content">
|
|
aka <b>export</b> view
|
|
</span>
|
|
</a>
|
|
<a className="tw:flex tw:flex-row tw:pl-4 tw:items-center" href="#measurements">
|
|
<MeasurementsIcon className="tw:w-5 tw:h-5" />
|
|
<span className="tw:pl-2">Pattern Measurements</span>
|
|
<span className="tw:pl-4 tw:text-sm tw:text-base-content">
|
|
aka <b>measurements</b> view
|
|
</span>
|
|
</a>
|
|
<a className="tw:flex tw:flex-row tw:pl-4 tw:items-center" href="#undos">
|
|
<BackIcon className="tw:w-5 tw:h-5" />
|
|
<span className="tw:pl-2">Undo History</span>
|
|
<span className="tw:pl-4 tw:text-sm tw:text-base-content">
|
|
aka <b>undos</b> view
|
|
</span>
|
|
</a>
|
|
<a className="tw:flex tw:flex-row tw:pl-4 tw:items-center" href="#layout">
|
|
<PrintIcon className="tw:w-5 tw:h-5" />
|
|
<span className="tw:pl-2">Pattern Layout</span>
|
|
<span className="tw:pl-4 tw:text-sm tw:text-base-content">
|
|
aka <b>layout</b> view
|
|
</span>
|
|
</a>
|
|
<a className="tw:flex tw:flex-row tw:pl-4 tw:items-center" href="#docs">
|
|
<DocsIcon className="tw:w-5 tw:h-5" />
|
|
<span className="tw:pl-2">Documentation</span>
|
|
<span className="tw:pl-4 tw:text-sm tw:text-base-content">
|
|
aka <b>docs</b> view
|
|
</span>
|
|
</a>
|
|
<a className="tw:flex tw:flex-row tw:pl-4 tw:items-center" href="#editsettings">
|
|
<EditIcon className="tw:w-5 tw:h-5" />
|
|
<span className="tw:pl-2">Edit settings by hand</span>
|
|
<span className="tw:pl-4 tw:text-sm tw:text-base-content">
|
|
aka <b>editSettings</b> view
|
|
</span>
|
|
</a>
|
|
<a className="tw:flex tw:flex-row tw:pl-4 tw:items-center" href="#inspect">
|
|
<XrayIcon className="tw:w-5 tw:h-5" />
|
|
<span className="tw:pl-2">Pattern inspector</span>
|
|
<span className="tw:pl-4 tw:text-sm tw:text-base-content">
|
|
aka <b>inspect</b> view
|
|
</span>
|
|
</a>
|
|
<a className="tw:flex tw:flex-row tw:pl-4 tw:items-center" href="#logs">
|
|
<ListIcon className="tw:w-5 tw:h-5" />
|
|
<span className="tw:pl-2">Pattern Logs</span>
|
|
<span className="tw:pl-4 tw:text-sm tw:text-base-content">
|
|
aka <b>logs</b> view
|
|
</span>
|
|
</a>
|
|
<a className="tw:flex tw:flex-row tw:pl-4 tw:items-center" href="#test">
|
|
<BeakerIcon className="tw:w-5 tw:h-5" />
|
|
<span className="tw:pl-2">Test Design</span>
|
|
<span className="tw:pl-4 tw:text-sm tw:text-base-content">
|
|
aka <b>test</b> view
|
|
</span>
|
|
</a>
|
|
<a className="tw:flex tw:flex-row tw:pl-4 tw:items-center" href="#timing">
|
|
<GaugeIcon className="tw:w-5 tw:h-5" />
|
|
<span className="tw:pl-2">Time Design</span>
|
|
<span className="tw:pl-4 tw:text-sm tw:text-base-content">
|
|
aka <b>timing</b> view
|
|
</span>
|
|
</a>
|
|
<a className="tw:flex tw:flex-row tw:pl-4 tw:items-center" href="#picker">
|
|
<UiIcon className="tw:w-5 tw:h-5" />
|
|
<span className="tw:pl-2">Choose a different view</span>
|
|
<span className="tw:pl-4 tw:text-sm tw:text-base-content">
|
|
aka <b>picker</b> view
|
|
</span>
|
|
</a>
|
|
|
|
### Draft Pattern <span className="tw:pl-4 tw:text-sm tw:text-base-content">aka <b>draft</b> view</span> {#draft}
|
|
|
|
<DraftView />
|
|
|
|
### Choose a different design <span className="tw:pl-4 tw:text-sm tw:text-base-content">aka <b>designs</b> view</span> {#designs}
|
|
|
|
<DesignsView />
|
|
|
|
### Save pattern as... <span className="tw:pl-4 tw:text-sm tw:text-base-content">aka <b>save</b> view</span> {#save}
|
|
|
|
<SaveView />
|
|
|
|
### Export Pattern <span className="tw:pl-4 tw:text-sm tw:text-base-content">aka <b>export</b> view</span> {#export}
|
|
|
|
<ExportView />
|
|
|
|
### Measurements <span className="tw:pl-4 tw:text-sm tw:text-base-content">aka <b>measurements</b> view</span> {#measurements}
|
|
|
|
<MeasurementsView />
|
|
|
|
### Undo History <span className="tw:pl-4 tw:text-sm tw:text-base-content">aka <b>undos</b> view</span> {#undos}
|
|
|
|
<UndosView />
|
|
|
|
### Pattern Layout <span className="tw:pl-4 tw:text-sm tw:text-base-content">aka <b>layout</b> view</span> {#layout}
|
|
|
|
<LayoutView />
|
|
|
|
### Documentation <span className="tw:pl-4 tw:text-sm tw:text-base-content">aka <b>docs</b> view</span> {#docs}
|
|
|
|
<DocsView />
|
|
|
|
### Edit settings by hand <span className="tw:pl-4 tw:text-sm tw:text-base-content">aka <b>editSettings</b> view</span> {#editsettings}
|
|
|
|
<EditSettingsView />
|
|
|
|
### Pattern inspector <span className="tw:pl-4 tw:text-sm tw:text-base-content">aka <b>inspect</b> view</span> {#inspect}
|
|
|
|
<InspectView />
|
|
|
|
### Pattern Logs <span className="tw:pl-4 tw:text-sm tw:text-base-content">aka <b>logs</b> view</span> {#logs}
|
|
|
|
<LogsView />
|
|
|
|
### Test Design <span className="tw:pl-4 tw:text-sm tw:text-base-content">aka <b>test</b> view</span> {#test}
|
|
|
|
<TestView />
|
|
|
|
### Time Design <span className="tw:pl-4 tw:text-sm tw:text-base-content">aka <b>timing</b> view</span> {#timing)
|
|
|
|
<TimingView />
|
|
|
|
### Choose a different view <span className="tw:pl-4 tw:text-sm tw:text-base-content">aka <b>picker</b> view</span> {#picker}
|
|
|
|
<PickerView />
|
|
|
|
## Editor Menus
|
|
|
|
Depending on the view you have selected, different menus will be available.
|
|
The full list of menus is:
|
|
|
|
- [View Menu](#view-menu)
|
|
- [Design Options Menu](#options-menu)
|
|
- [Core Settings Menu](#settings-menu)
|
|
- [UI Preferences Menu](#preferences-menu)
|
|
- [Flags Menu](#flags-menu)
|
|
- [Test Menu](#test-menu)
|
|
- [Layout Menu](#layout-menu)
|
|
|
|
### View Menu {#view-menu}
|
|
<ViewMenu />
|
|
|
|
### Design Options Menu {#options-menu}
|
|
<OptionsMenu />
|
|
|
|
### Core Settings Menu {#settings-menu}
|
|
<SettingsMenu />
|
|
|
|
### UI Preferences Menu {#preferences-menu}
|
|
<PreferencesMenu />
|
|
|
|
### Flags Menu {#flags-menu}
|
|
<FlagsMenu />
|
|
|
|
### Test Menu {#test-menu}
|
|
<TestMenu />
|
|
|
|
### Layout Menu {#layout-menu}
|
|
<LayoutMenu />
|
|
|