6.7 KiB
title: "Aaron A-Shirt: Sewing Instructions"
Stap 1: Sluit de naden

Put front and back on top of each other with good sides together. Sew the side seams and the short seams at the shoulder straps. If you have a serger, this is a good moment to use it. If not, finish your seams otherwise.
Stap 2: Werk de zoom af

Fold the hem upwards, and sew it down. If you have a coverlock, use it. If not, use a twin needle or zig-zag stitch to keep the seam stretchable.
Fold only once, to avoid bulk
Knitwear doesn't ravel, so you can simply fold this over once and sew it down, then neatly trim back the fabric.
Stap 3: Stik de halsbies aan de voorkant
Over jersey bies
Als je nieuw bent met jersey biezen, kan je deze pagina over het onderwerp lezen.
Herhaal stap 3 en 4 voor zowel armsgaten als de halsopening
De onderstaande procedure is zowel van toepassing op de armsgaten als op de halsopening. Met andere woorden, je zal dit drie keer moeten doen.
Begin met de eenvoudigste opening
Ik raad je aan om te beginnen met elke opening die de meest uniforme curve heeft. Meestal zijn dit de armsgaten, maar als je de patroonopties aangepast hebt (denk aan een racerback) is dat misschien niet het geval.
Hoe dan ook, hoe minder scherp de curves zijn, hoe makkelijker. Start dus met een makkelijker opwarmertje voor je aan de lastigere stukken begint.
We are going to finish the arm and neck hole with knit binding (note: not a knit band. There's a difference, and it's explained here).
Dit is het enige onderdeel van dit hemdje waar wat oefening voor vereist is. Geen zorgen, als je er een paar maakt ben je een pro voor je het weet.
Kies je startpunt

The first thing we need to do is decide where we are going to start/stop our binding. Here's what I suggest:
- Voor de armsgaten: aan de zijnaad. Zo zit de naad verstopt onder je arm
- Voor de halsopening: middenachter aan je nek. Misschien wil je dit markeren met een pin
Positioneer (het begin van) je bies
Put your A-shirt down with the good side up, and place your binding strip on top of it with the good side down (as in, good sides together).
Align the long edge of your strip with the edge of your fabric so the strip lies on top of the fabric (not in the opening). Place the corner on your starting point.
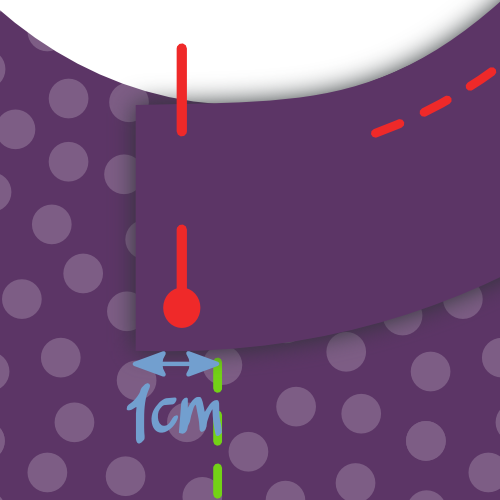
Now shift your binding strip 1cm beyond your starting point. This little extra will guarantee we can join the two ends later.
Zorg dat je weet waar je naait

We are going to sew 1.5cm from the edge. So be careful because this is not the standard seam allowance.
Als je naaimachine geen markeringen heeft om de afstand van de naald tot de rand van de stof aan te geven kan je een zoommaatje gebruiken. Of doe wat ik doe, plak een stukje plakband op je naaimachine en markeer er een lijn op 1,5 cm van je naald. Dan moet je alleen maar de rand van je stof gelijk houden met die lijn.
Also, we are not starting at our start point, but we skip the first 3cm. We'll need this wiggle room later to join the ends of our binding.
Stik de bies vast

Sew your binding in place while gently stretching the binding, but not the fabric. Make sure not to sew the last 3cm but leave them, just as you did at the start.
You might need to practice a bit to get the hang of it.
Zorg dat je je bies een beetje meer uitrekt als je bij een scherpere curve komt. Lees mijn opmerkingen over jersey biezen voor meer info.
Markeer het einde van je biezen

With about 6cm left to go before we complete our circle, it's time to sew the ends of the binding together.

Take one of the edges, and stretch it along the 3cm seperating it from the start point as you would while sewing.
Mark the binding where it reaches the start point. Do the same for the other end.
Stik de uiteindes van de biezen aan elkaar

Fold your A-shirt in whatever way makes it easier for you to place both binding ends with good sides together, aligning the marks. Sew them together on the mark.
6 cm is niet veel, maar zou genoeg moeten zijn om de twee uiteindes makkelijk onder je naaimachine te leggen en aan elkaar te naaien.
Stik de laatste 6 cm van de bies vast

Now that your binding ends are joined together, it's time to finish the last 6cm of binding. Sew it down, staying 1.5cm from the edge as you did before.
Stap 4: Plooi bies naar achter en stik vast
Plooi je bies over de rand van de stof naar de achterkant

Fold your binding fabric around the fabric of your A-shirt to the back. This is how we'll sew it down.
Vooraan is de bies twee keer geplooid (en wordt de rand van de stof meteen verborgen), maar aan de verkeerde kant is dit niet nodig. Later kunnen we gewoon het randje wat bijknippen, aangezien jersey niet rafelt. Als we de bies aan de achterkant ook zouden plooien zou dit alleen maar bulk toevoegen.
Stik de bies vast

From the right side of your fabric, sew along the inner edge of your binding (furthest from the edge), making sure to catch the binding at the back in the process.
Als je een coverlock hebt is dit ook een perfect moment om die te gebruiken
You'll have to, once again, stretch your binding a bit while doing this. But this time, there's an extra caveat to look out for.
Beware of the uneven feed
As you feed your binding through your sewing machine, the feed dogs will pull the bottom layer (back of your binding) forward.
In een ideale wereld zouden alle lagen gelijkmatig volgen. Maar meestal blijft de bovenste laag (de voorkant van je bies) wat achter. Dit zorgt dat je bies niet helemaal recht rond de randjes geplooid ligt, en lelijke rimpels maakt.
Dus let op, en als je het ziet gebeuren, rek dan de onderlaag een beetje extra uit om te compenseren.
Stap 5: knip de bies bij aan de binnenkant
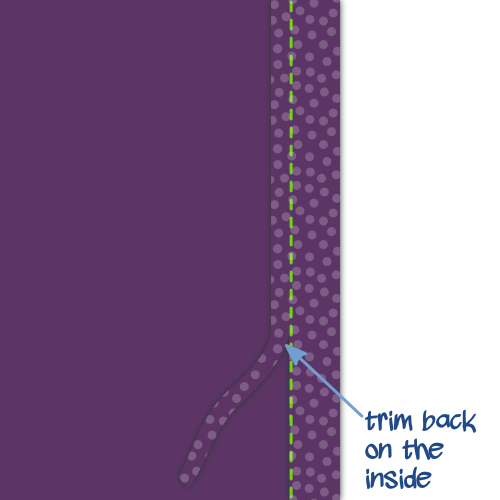
On the inside of your A-shirt, trim back the knit binding against your seam to finish up.
Doe dit voorzichtig zodat je niet per ongeluk een gat in je hemdje knipt. Ik spreek uit ervaring.