30 KiB
title: "Simon shirt: Sewing Instructions"
Suivez la couture avec Kelly et Julian
Kelly Hogaboom et Julian Collins ont fait une couture de Simone, et ils ont des vidéos de toutes les étapes. Si vous cherchez à créer ce modèle, Kelly et Julian peuvent vous guider vers la fin.
You can find all the material's on Kelly's site: #simonsayssew with kelly hogaboom & julian collins
Étape 1 : Thermocoller l'entoilage

Thermocoller au fer l'entoilage sur les poignets
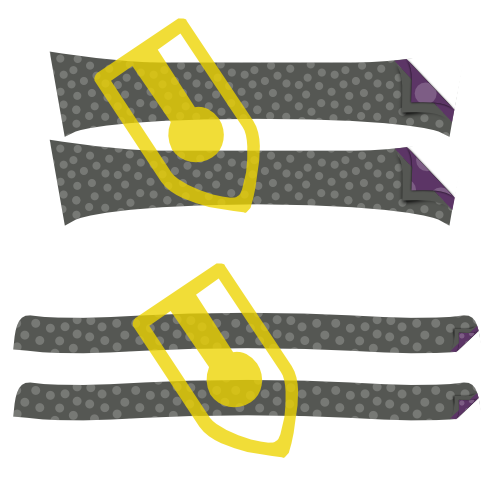
To make two cuffs, you have cut out your cuff piece four times in fabric, and twice in interfacing.
For each cuff, press the interfacing piece to the bad side of the cuff piece.
Si l'envers et l'endroit de votre poignet sont coupés dans le même tissu, peu importe le côté sur lequel vous collez l'entoilage.
Cependant, un détail prisé consiste à utiliser un tissu différent pour l'intérieur du poignet. Dans ce cas, assurez vous de thermocoller l'entoilage sur la pièce qui se trouvera à l'extérieur du poignet. Dans ce cas, assurez-vous de thermocoller l'entoilage sur la pièce du poignet qui sera côté extérieur.
Selon le poignet que vous avez choisi, la forme du poignet sera différente.
In the first illustration, you can see both a round barrel cuff and a French cuff as examples.
Ci dessous, les images montrent un poignet arrondi, mais le processus est le même pour les autres types de poignets.
Press interfacing to collar, undercollar and collar stand
To make your collar, you need to cut one undercollar, one collar, and two collar stands. All of this both in fabric and interfacing.
For each piece, press the interfacing piece to the bad side.
Préparer les poignets
Coudre les poignets ensemble

Place both parts of your cuff (one with interfacing, one without) together with the good sides, and sew them together at the standard seam allowance.
Ensure you
- ne pas coudre le côté qui sera assemblé à la manche plus tard
- vous arrêter de coudre à la marge de couture, à partir du bord qui sera assemblé à la manche
Dégarnir la marge de couture

Before we flip your cuff over, we need to trim back the seam allowance to remove bulk.
Repasser la marge de couture

Fold back the seam allowances on each side of the cuff where the cuff attaches to the sleeve, and press them down.
Si vous avez cousu trop loin, décousez quelques points.
Retourner le poignet et repasser

Flip your cuff with the good sides out, and give it a good press.
When pressing your cuffs, make sure to roll the seam a bit to the backside of the cuff to guarantee that the inner fabric of the cuff is not visible.
You can now put your cuffs aside, we'll attach them later.
Etape 3 : Préparer le col
Coudre ensemble le col et le sous-col

Place both collar parts with the good sides together, and sew them together at the standard seam allowance.
Dégarnir la marge de couture

Before we flip your collar over, we need to trim back the seam allowance to remove bulk.
Retourner le col et repasser

Flip your collar with the good sides out, get those tips as pointy as possible, and give it a good press.
Quand vous repassez votre col, souvenez vous que le sous-col est un peu plus étroit.
Quand vous alignez les côtés non cousus, ceci fera rouler la couture au dos du col, et garantira que la face interne du col ne soit pas visible.
Surpiquer le col

Top-stitch along the edge of the collar. This locks down the seam allowance and makes for a crisp look.
La distance à partir du bord à laquelle vous surpiquez est une question de choix personnel. C'est souvent un peu moins que la marge de couture. Jetez un coup d'oeil sur des chemises existantes pour vous faire une idée.
Etape 4 : assembler le col et le sous-col
Placer le col entre les deux pieds de col et bâtir

Mark the middle point of your collar and your collar stands with a pin. The middle point of each collar stand is actually slightly off-center since one end is longer than the other. Instead, find the middle point between the two notches.
First place a collar stand with the good side up, then your collar with the undercollar facing up (and the non-sewn side at the top), and finally the second collar stand with the good side down.
Your collar should sit between your two collar stands, and the middles (where you placed your pin) should be aligned.
L'aspect dépend un peu du col que vous avez choisi, mais en général votre col est courbé vers le bas, et votre pied de col est courbé vers le haut.
Pour ajuster le tout, nous allons bâtir, plutôt qu'épingler. Votre col est une partie importante de votre chemise, donc il le mérite.
First, replace the pins marking the middle with a pin that pins all parts together.
Now, start basting from this pin and work your way to the corner of the collar, making sure to align both edges of the fabric.
When you reach the corner of your collar, keep going and baste the end of both collar stands together.
When you've done one side, start from your pin in the middle again and do the other side. When you're done basting, you can take out the pin.
Coudre votre col sur les pieds de col

Sew along the edge of your collar stand, respecting the standard seam allowance.
Assurez-vous de vous arrêter 2 cm avant le bord (deux fois la marge de couture standard) car à l'étape suivante, nous allons replier ce bord, et nous avons besoin de laisser les pieds de col suffisamment séparés pour glisser la chemise entre eux plus tard.
Replier la marge de couture du pied de col et repassez là
Fold back the seam allowance of your collar stand on the non-sewn side and press it down.
Au milieu, ce sera facile. Mais vers les pointes de votre col, ce sera difficile de ne pas faire de plis.
Press it as best as you can without making folds in your collar. Nous repasserons à nouveau quand le col sera retourné.
Retourner le col et repasser

Flip your collar stand with the good sides out, and give it a good press. Make sure to keep the seam allowance on the collar stand folded inwards.
You can now put your collar aside, we'll attach it later.
Etape 5 : Coudre votre étiquette

Our next step is to attach the yoke. But the yoke is a great place to put your label. So if you'd like to do that, we might as well start with that.
Pick one yoke, and you can sew your label on it in the center (on the good side).
Étape 6 : Assembler les empiècements dos au dos

Place one yoke with the good side up. On top of that, place your back with the good side up, aligning the seam where it needs to be attached to the yoke.
Finally, place your second yoke on top of the back, but with the good side down.
Your back should now be sandwiched between the good sides of your two yokes.
If that's the case, sew them in place along the back/yoke seam, making sure to respect the seam allowance.
Si vous avez ajouté une étiquette à l'étape 5, assurez-vous de mettre l'empiècement portant l'étiquette sur l'envers.
When you're done, don't forget to give it a good press to make the seam lie flat.
Étape 7 : Surpiquer l'empiècement dos

With your yokes attached to the back, we are going to edge-stitch along the seam we just made, on the yoke side.
Pliez la partie de l'empiècement dos située à l'intérieur de la chemise hors du chemin, vers le bas. Our edge stitching will catch the outer yoke, back and all the seam allowances, but not the inner yoke.
Just sew right next to the seam joining the outer yoke to the back.
La surpiqûre de renfort est comme une simple surpiqûre mais elle se fait juste à côté de la couture.
Étape 8 : Fermer les pinces du dos


Selon vos mesures, votre patron peut ne pas avoir de pinces. Dans ce cas, passez à l'étape suivante.
Your pattern may or may not have back darts. If it has them, you should close them now.
Place your back down with the good side up, and fold it back from the side seam so the fold runs from the top to the bottom of your dart.
Do the same for the other dart, so that both sides are folded back.
Feel free to gently press in this crease, it will help you to neatly sew the darts.
Sew across the line marking the dart to close the darts. Be careful to make sure the top and bottom of your darts are precisely where they need to be. If one dart sits higher than the other, it will look bad.
When you're done, don't forget to give it a good press. Press the extra fabric of the dart towards the side seams.
Étape 9 : Préparez la patte de boutonnage (côté boutons)
Si vous avez choisi une patte de boutonnage intégrée, vous pouvez passer les deux premières sous-étapes et passer à Replier la patte de boutonnage.
Coudre la patte de boutonnage

If you have chosen a separate button placket, sew it to the Front Right piece.
Place the Front Right (piece 1) down with the good side up, and place the Button Placket (piece 1b) on top of it with the good side down, making sure to align the seam.
Sew it in place with the default seam allowance.
Repassez la couture en couchant la marge de couture côté patte de boutonnage
Place your front with the good side down, and press the seam allowance to the button placket side.
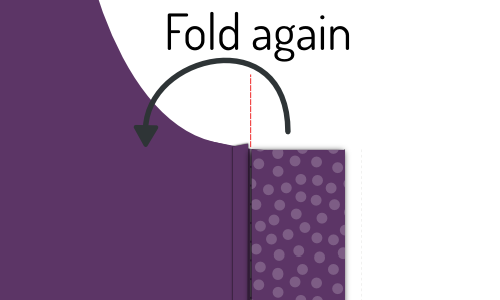
Replier la patte de boutonnage

Now, fold over the button placket on the first fold line, and press this fold in place.
Then, fold the placket over again, making sure to have the fabric extend just beyond the seam that joins your placket to the front.
When you're happy, press the folded placket.
Fixer la patte de boutonnage

Ce qui suit est l'approche classique. Si vous avez choisi une patte de boutonnage intégrée (sans couture), passez cette étape.
Plutôt que de coudre la patte de boutonnage, laissez-la pliée. Les plis seront fixés en place par les boutons lorsqu'ils seront cousus plus tard.
From the good side of your shirt, sew down the folded placket by stitching in the ditch.
To do so, sew exactly on top of your earlier seam. Since you folded the fabric of your placket a bit past this seam, it will get caught at the back, fixing your folded placket in place, and locking the seam allowance inside.
Etape 10: Préparer la patte de boutonnage (côté boutonnières)
Si vous avez choisi une patte intégrée, vous pouvez passer les deux premières sous-étapes et passer à "Replier la patte de boutonnage".
Fixer la patte de boutonnage (côté boutonnières)

If you have chosen a separate buttonhole placket, sew it to the Front Left piece.
Place the Front Left (piece 2) down with the good side up, and place the Buttonhole Placket (piece 2b) on top of it with the good side down, making sure to align the seam.
Sew it in place with the default seam allowance.
When you're done, don't forget to give it a good press. Press the seam allowance towards the placket side.
Repassez la couture en couchant la marge de couture côté patte de boutonnage
Place your front with the good side down, and press the seam allowance to the buttonhole placket side.
Comprendre une patte de boutonnage classique (côté boutonnière)
Si vous avez choisi une patte sans couture, suivez les étapes de la patte de boutonnage côté boutons, car le principe est le même.
Les étapes ci-dessous sont celles d'une patte de boutonnage (côté boutonnières) classique.

Your placket has a bunch of lines on it, so let's first clarify what they are:
- La ligne de boutonnières est en pointillés longs et des boutonnières y figurent. Elle indique la position des boutonnières
- Les deux lignes de plis sont en pointillés longs et sont à égale distance à droite et à gauche de la ligne de boutonnière
- Les deux + deux lignes de couture sont en pointillés courts, à égale distance de chaque ligne de pli
Dégarnir la marge de couture
(Si vous avez choisi une patte intégrée, passez cette étape).

The seam allowance of where you sewed your buttonhole placket to your front should fit inside your folded placket.
For that, trim back the seam allowance so that it doesn't extend beyond the first fold line on the placket.
Replier la patte de boutonnières

Fold the placket on the first fold line. Press the fold in place.
Then, fold the part you just folded again, this time on the second fold line. Press this fold in place too.
Lorsque votre patte est pliée et repassée, mettez quelques épingles sur toute la longueur pour maintenir en place
Fixer la patte de boutonnage (côté boutonnières)


Sew on the first sew line, closest to the edge.
Then, flip your shirt over so that the good side is up, and your placket is up too. Then sew on the second sew line.
Ces deux lignes de couture seront visibles, alors faites-les bien nettes
Repasser la patte de boutonnières

Congratulations, you made a classic buttonhole placket.
Now press that baby. You know you want to.
Etape 11: Assemblez les coutures d'épaule
Faisons un burrito
We are going to close the shoulder seams with a technique that is commonly known as the burrito method.
Si vous connaissez la méthode du burrito, vous savez déjà comment faire. Si ce n'est pas le cas, lisez ce qui suit pour découvrir une méthode astucieuse pour assembler les coutures d'épaule de votre chemise tout en emprisonnant de façon invisible tous les bords bruts.
Épingler les devants à la partie extérieure de l'empiècement dos


Place your back down with the good side up, but be careful to fold the inner yoke downward (as illustrated by the dotted line.
Place your fronts on your back, with the good sides down. Pin fronts to the yoke at the shoulder seam, good sides together.
Roulez, roulez, roulez, roulez votre chemise, épinglez et cousez vos épaules

Roll up your back and fronts starting at the hem. Roll them into a neat sausage upwards until you can see the entire turned down yoke.
Now, you can flip the inner yoke over your rolled sausage to align the shoulder seams with the other yoke and fronts.
Pin them in place, and then sew the shoulder seams, making sure to keep your sausage (or burrito stuffing) out of the way so it doesn't get caught in the seam.

Assurez-vous d'aligner la vraie ligne de couture. En raison des angles inégaux à l'encolure, le bord du tissu est souvent plus long d'un côté que de l'autre.
However, the seamlines are the same length, so make sure to match them carefully using the notches.
Retournez-le à l'intérieur à travers l'encolure
When you've sewn both shoulder seams, reach in through the neck opening, and pull out the back and front parts to inside-out your burrito.
Repassez les coutures d'épaule

You did all this work, so now make sure you make it look super sharp by giving it a good press. Make sure that the seam allowance between your yokes lies nice and flat for that.
Etape 12: Surpiquer l'empiècement aux coutures d'épaule

Just as we've edge-stitched the bottom seam of the yoke in Step 3, we're going to edge-stitch the yoke at the shoulder seams too.
Since you've just pressed these shoulder seams, everything should lie nice and flat, and you just need to run a stitch right next to the seam.
Assurez-vous de surpiquer sur la partie empiècement, ce qui permet d'emprisonner la marge de couture, et non sur la partie avant.
Etape 13 : Faire la patte de manche
Coudre la sous-patte de poignet


- Placez votre manche sur l'endroit, et votre sous-patte de poignet dessus, également sur l'endroit.
- Alignez le bord de votre sous-patte avec la fente de votre manche, en plaçant la sous patte sur le côté le plus court par rapport à la fente.
- Coudre maintenant le long de la ligne de pli indiquée sur la sous-patte la plus proche du bord.
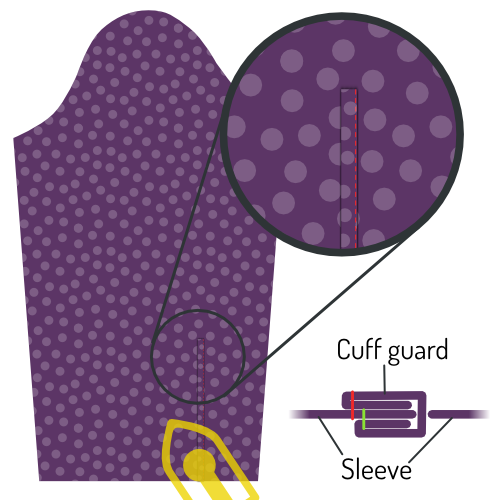
Si vous n'aviez pas encore coupé dans votre manche la ligne sur laquelle la patte de manche doit être placée, vous devez le faire maintenant.
- Repliez la sous-patte, et repasser la couture.
- Retournez votre manche sur l'endroit, et ramenez votre sous-patte par dessus la fente de votre manche.
- Plier deux fois sur les lignes de façon à emprisonner le bord brut.
- Make your folds so that the upper fold sits ever so slightly further than the seam you already made.
- Repassez le tout, puis surpiquez la sous-patte.
Plier et repasser la patte

Origami time! We're going to fold the sleeve placket overlap using the marked fold lines as our guide. This will be a lot easier if you press between each fold.
- Tout d'abord, pliez les bords extérieurs de la patte vers l'intérieur.
- Next, fold the entire thing in half.
- Puis faites deux plis à l'extrémité pour obtenir une belle forme pointue.
- Maintenant donnez un bon coup de fer.
Épingler la patte en place


Place your sleeve down with the good side up. The guard we have sewn in earlier sits against the other unfinished fabric edge of where you cut into your sleeve.
Place your placket around that edge, one side above it, one underneath.
You need to slide the placket onto your sleeve until the middle of it (the tip) aligns with the cut in your sleeve.
The idea is that the placket closes up the unfinished edge, but also covers the guard of the other edge.
When you've got it where you want it, pin the placket down.
Coudre la patte de manche

Start at the edge of the sleeve (the bottom of the sleeve placket) and edge-stitch along the edge upwards.
Go around the tip, and come down again on the other side (the fold side) until you have passed the point where your guard ends.
Then, sew horizontally to the other side of the placket to finish.
J'ai inclus ici une illustration supplémentaire qui ne montre que le contour de la patte. Vous pouvez voir que l'extrémité de la sous-patte est prise dans la couture de la patte, et est ainsi bien cachée.
Etape 14: Assembler les manches
Rappelez vous, il s'agit d'une couture plate rabattue

Attention avec la marge de couture supplémentaire pour la couture plat rabattue. Une marge de couture supplémentaire est prévue sur la manche pour permettre la réalisation d'une couture plate rabattue.
Par conséquent, ce sont les coutures et non les bords qui doivent être alignés, donc il faut positionner la manche de façon à ce qu'elle dépasse du bord de 1 cm.
Pin sleeve in place

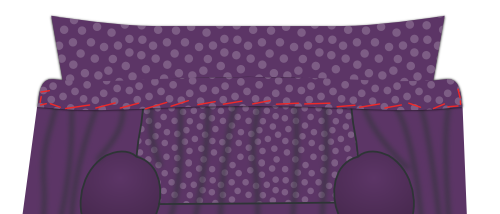
Spread your shirt open so that both fronts and back lie flat with their good sides up.
Now place your sleeve on top with the good side down, matching the top of the sleeve with the shoulder seam.
Be careful, your sleeve is not symmetric, so be sure to have the back notch (⊗) and cuff guard on the back side, and the front notch (⊙) on the front side.
Also note that the back notch (⊗) on the sleeve does not have a corresponding notch on the back of the shirt. That's because it should match up with the seam where your yoke joins the back.
You now need to pin the sleeve to the armhole. To do so, make sure to:
- Faire correspondre le début et la fin de la tête de manche au début et à la fin de l'emmanchure
- Faire correspondre les repères de la tête de manche aux repères du dos et des devant
- Distribuer l'embu entre les repères comme indiqué
Distribute sleevecap ease

The default sleevecap ease for this pattern is 0.5cm. If you have sleevecap ease, you need to distribute that extra length evenly between the notches as shown.
If you are unsure what sleevecap ease is, have a look at the documentation for the sleevecap ease pattern option.
Coudre les manches aux emmanchures
When you've got your sleeve neatly pinned in your armhole, sew it in place. Be careful to avoid any pleats in the part between the notches where you need to ease in the sleevecap ease.
Inutile de le dire, mais je le dis quand même: répétez cette étape pour l'autre manche.
Etape 15: Couture plate rabattue aux emmanchures
Coucher la marge de couture d'un côté au fer

Lay down your freshly sewn sleeve seam with the good side down
We are going to press the seam allowance to one side. To do so, identify the seam allowance that is wider (for the flat-felled seam).
The longer seam allowance needs to lie on top of the shorter (standard seam allowance).
Once you have verified that, press down the seam allowance.
Replier la marge de couture excédentaire

Now, fold the extra seam allowance for the flat-felled seam under the standard seam allowance.
You can use pins to hold this in place, but it's simpler to just press it.
Cela sera relativement facile sur les parties droites de la couture, mais un peu plus délicat sur les parties courbes. Prenez votre temps, et au besoin, couper l'excédent de tissu dans la marge de couture pour lui permettre de s'évaser ou se courber.
Coudre la couture plate rabattue
Now, from the bad side of the fabric, sew the seam allowance down just at the edge where it folds under the other seam allowance.
Here it is important to keep an even distance from the seam of your sleeve. If you have a felling foot for your sewing machine, it will help you with that. But if not, just be careful.
Il est plus important de rester à la même distance de la couture de manche que de coudre exactement au bord du pli. Idéalement, le pli est censé être aussi à distance constante de la couture, mais si ce n'est pas le cas, assurez-vous juste de coudre parallèlement à la couture de manche. Même si cela implique de s'écarter un peu du bord plié.
Repasser la couture plate rabattue
When it's all done, press the flat-felled seam from the good side so it lies nice and flat.
Etape 16: : Fermer les côtés et les manches


Place your shirt with the good sides together, and sew the side and sleeve seams to close the shirt.
Il y a une marge de couture supplémentaire sur la manche et les côtés pour permettre la réalisation d'une couture plate rabattue. Par conséquent, n'alignez pas les bords, mais laissez dépasser d'1 cm le côté avec la marge de couture supplémentaire.
Etape 17: Coudre les côtés et les manches avec une couture plate rabattue
Coucher la marge de couture d'un côté au fer
We are going to press the seam allowance to one side. To do so, identify the seam allowance that is wider (for the flat-felled seam).
The longer seam allowance needs to lie on top of the shorter (standard seam allowance).
Once you have verified that, press down the seam allowance.
Replier la marge de couture excédentaire
Now, fold the extra seam allowance for the flat-felled seam under the standard seam allowance.
You can use pins to hold this in place, but it's simpler to just press it.
Cela sera relativement facile sur les parties droites de la couture, mais un peu plus délicat sur les parties courbes. Prenez votre temps, et au besoin, couper l'excédent de tissu dans la marge de couture pour lui permettre de s'évaser ou se courber.
Coudre la couture plate rabattue
Now, from the bad side of the fabric, sew the seam allowance down just at the edge where it folds under the other seam allowance.
Important here is to keep an even distance from the seam of your sleeve. If you have a felling foot for your sewing machine, it will help you with that. But if not, just be careful.
Il est plus important de rester à la même distance de la couture de manche que de coudre exactement au bord du pli. Idéalement, le pli est censé être aussi à distance constante de la couture, mais si ce n'est pas le cas, assurez-vous juste de coudre parallèlement à la couture de manche. Même si cela implique de s'écarter un peu du bord plié.
Repasser la couture plate rabattue
When it's all done, press the flat-felled seam from the good side so it lies nice and flat.
Assembler les poignets aux manches
Épingler les poignets en place

You need to insert the sleeve between the two layers of your cuff, making sure that the good side of the fabric sits against the side of your cuff that has the interfacing applied to it.
You will need to pin this in place, because depending on how long your sleeve placket is, it might be hard or even impossible to get this to lie flat.
Also note that your sleeve edge will be longer than your cuff (how much longer depends on the sleeve drape). You need to make one or a few folds in your sleeve to accommodate for this.
Your pattern contains helplines on the sleeve to help you place the folds.
Prenez votre temps pour épingler tout ceci avec soin. We are going to edge-stitch this later, so it's important that the front and back of your cuff align nicely.
Piquer les poignets aux manches

Once everything is pinned in place, edge stitch along the edge of your cuff to attach it to your sleeve.
It's important to catch both the outer and inner layer of your cuff on the edge.
Assurez-vous de piquer sur la face extérieure (endroit de votre manche) en restant parallèle au bord du poignet.
When you're done, give your cuffs a good press.
Surpiquez les poignets

Assurez-vous que vos poignets ont été repassés au préalable.
Top-stitch around your cuff at a distance from the edge that is a bit less than your seam allowance. Go all the way around your cuff.
Etape 19: Attacher le col
Bâtir le col en place
This is an important seam, so we are going to baste this in place to make sure it sits exactly right before we sew it.
Start at the center back, and place the seam allowance of your back part between your two collar stands. Work your way around one side, and then do the other.
Make sure to respect the standard seam allowance and - important - avoid any wrinkles.
Bien que votre pied de col soit relativement droit, nous allons le coudre à ce qui est en fait un trou dans votre chemise.
C'est un peu délicat, donc faites très attention aux parties les plus courbées : là où le dos rejoint les devants.
Piquer le col en place


When you're happy with how you've basted your collar in place, it's time to sew that thing down.
We're going to start at the center-back and sew all the way around the collar stand.
Coudre le long du bord du col

To give more body to your collar, and firmly secure it in place we're going to sew along the top edge of the collar stand.
Sew about half the seam allowance from your earlier edge-stitching. Make sure to stop a few cm before the end of the collar.
Vous devez arrêter quelques cm avant la fin du col (note: fin du col, et non fin du pied de col) de façon à ce que cette couture soit entièrement recouverte lorsque le col est plié.
Repasser le col

Now that your collar is attached, give it a good press.
Étape 20 : Ourler votre chemise


Time to finish the hem (that's the part you tuck in your trousers).
Fold up half of the hem allowance and press down. Then, fold up again and press again.
Now, sew along the upper edge to finish the hem.
Etape 21 : Faire les boutonnières
If you haven't done so initially, mark all the places you should have buttonholes.
They sit along the front closure and at your cuffs.
When you've marked them, make buttonholes there.
Étape 22: Coudre les boutons
Pin your shirt closed to transfer the place of the buttonholes to the button sides.
When you've marked where buttons should go, sew them on.
Plutôt que de marquer les emplacements des boutons à partir du patron, je préfère les repérer à l'aide des boutonnières une fois faites.
De cette façon, si une boutonnière a un peu dévié, le bouton la suivra tout simplement.