32 KiB
title: "Theo trousers: Sewing Instructions"
Le texte est un peu concis pour vous ? J'essaie de rendre les vidéos disponibles comme partie intégrante de la documentation du patron.
Dans ce cas particulier, il y a beaucoup de matériel vidéo disponible, mais il a été enregistré à l'origine pour une version précédente de ce modèle. « Malgré tout, de bonnes choses. »
La plupart des étapes ci-dessous doivent être répétées pour les deux pantalons.
Cela n'est pas toujours mentionné parce que la vie est courte et l'écriture continue N'oubliez pas de le faire pour les deux pantalons se fatigue très bientôt.
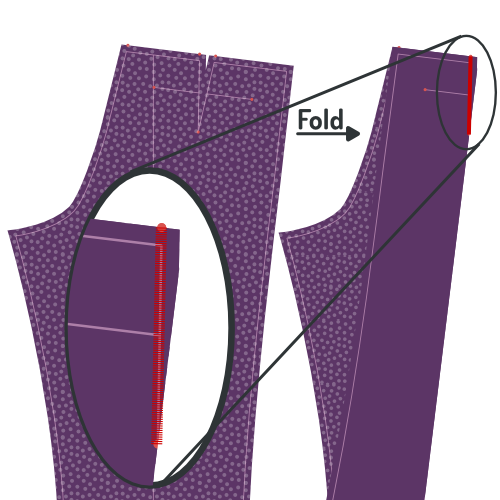
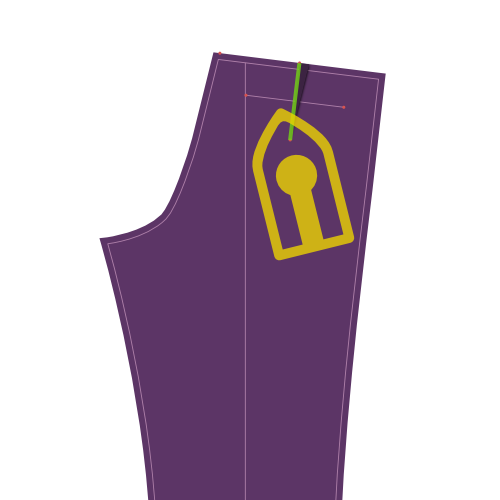
Étape 1 : Coller les lignes de pli

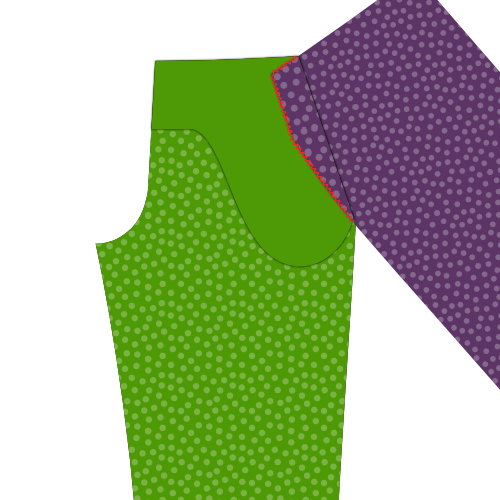
First thing to do is to baste over the pleat line of your trouser legs. Do it on both front and back pieces for both legs.
Étape 2 : Fermez les fléchettes arrière et appuyez sur
Fermer les fléchettes arrière
Fold piece 1 (back) double so that the notches of the dart on the waistband are aligned, and a sharp crease runs to the notch at the dart end. Feel free to briefly iron the crease, this will make it easier to sew the dart accurately.
Close the dart by sewing from the waistband down to the end of the dart.
Use a small stitch length, and let your stitch run completely to the end (and of) the dart, then backtrack making sure to veer into the seam allowance.
Appuyez sur les fléchettes arrières sur le côté
Press your back darts flat, folding the seam allowance to the side of your trousers.
Étape 3 : Construire les poches arrière
Construct the double welt pockets at the back of your trousers, including the pocket bag.
Poches double coulissantes
Construire une double poche soudée est une technique qui est utilisée pour différents vêtements. C'est pourquoi je l'ai branché dans sa propre page de documentation.
Il y a à la fois une documentation écrite et une série vidéo qui vous montre comment le faire, donc même si vous n'avez jamais fait de poches de soudage avant, vous serez bien.
À la documentation des poches de soudure
Étape 4 : Optionnel: Ajuster votre doublure avec des cisailles pinçantes

If you are going to line your trousers (it's optional), you'll need to finish the edge of your lining. To do so, trim the edge of the lining with pinking shears.
Note that you only need to do this for those edges of your lining that are not caught in a seam. In other words, only the bottom edge of your lining.
Si vous n'avez pas de cisailles roseuses, vous pouvez appliquer une autre finition comme un point de zig-zag ou utiliser un serger. Cependant, les cisailles roses sont meilleures pour ce scénario car elles n'ajoutent pas de masse, qui est important parce que nous voulons éviter le bord de la doublure en faisant une bosse dans votre pantalon.
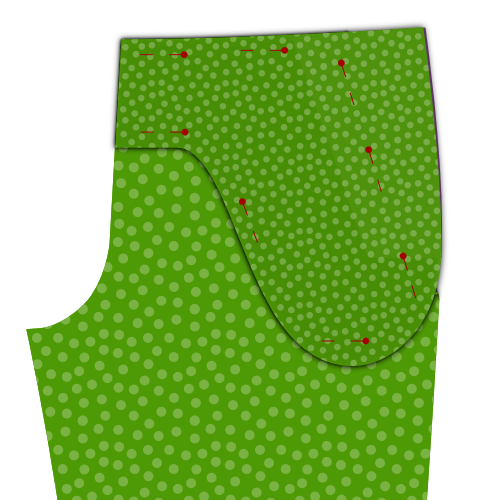
Étape 5 : Ajuster les pièces pour la poche avant
Align your front, lining and pocket bag on top of each other. Front and pocket back with their good side down, lining with the good side up.
Pin them together to make sure they don't move. Do so away from the pocket slant to not hinder yourself later.
Trim back the pocket bag (it should lie on top) exactly on the pocket slant line (marked on the pattern).
Now trim back the front piece (it should lie on the bottom) 3cm outwards from the slant line, parallel to it.
Finally, trim back your lining so that it stops 0.5 cm short of reaching the edge of your front.
La doublure est coupée un peu plus courte, de sorte que quand elle est pliée en arrière, elle ne s'affiche pas. Mais il n'est vraiment pas si important de le faire exactement 0,5 cm plus court.
Étape 6 : Replier le dos et coudre la poche avant
Fold back your lining and front piece along the pocket slant line (and thus along the trimmed edge of the pocket bag. Pin this down and press.
You are going to sew along the pocket slant, but make sure to flip everything over first so you can sew from the good side.
Topstitch a 0.5 cm from the fold, making sure to keep it parallel and not stretch your fabric.
Ce surpiqûre sera toujours montré, alors assurez-vous de correspondre à la couleur du fil et de le rendre joli.
Pour empêcher vos poches de se déposer, vous pouvez placer un morceau de ruban non étirant entre le pli. Lors de la broderie, vous attraperez également ce ruban, empêchant la poche de se déposer.
Étape 7 : Terminer le bord dans la poche avant
Fold away the main part of the front piece, so you can place the lining, pocket bag and folded edge of the front piece flat.
Zig-zag the edge of the folded-back front piece to finish it and secure it to the pocket back and lining.
Étape 8 : Appuyez sur la poche latérale

When you're done, place front piece, lining and pocket bag flat, and give it a good press.
Ce serait peut-être un bon moment pour vous rappeler que chaque étape devait être accomplie pour les deux jambes.
C'est juste un rappel amical, les prochaines étapes doivent être faites pour les deux jambes aussi.
Étape 9 : Attacher la pièce latérale au sac de poche

Place the other half of the pocket bag with the good side down, and align the side piece on it with the good side up.
Sew a zig-zag stitch along the edge of the side piece to finish it and attach it to the pocket bag.
Étape 10: Fermer le sac de poche

Place the front piece, lining and pocket bag with the pocket bag up.
Align the second pocket bag with the attached side piece facing down.
Pin all pieces together making sure to stay about the bottom curve of the pocket bag.
When everything is pinned together, fold away the front piece and lining, and close the bottom curve of the pocket bag.
Sew to bottom curve of the pocket bag up until the point where it reached the side piece
You can finish the pocket bag in a number of ways, including:
- Serge the sides together
- Finish the edge with bias tape
- Sew the sides together and finish the edge with a zig-zag stitch
Étape 11: Appuyez sur la poche avant

Put everything flat with the front piece at the bottom, and give it a good press.
Étape 12: Épingler la poche avant en place
Pin the pocket down to the front piece along the slant and the edges of the pocket bag. This will prevent it from shifting around while we continue to work on our trousers.
Étape 13: Terminer les bords latéraux

Before we are going to sew the side seams, finish the side edges by serging or running a zig-zag stitch along the sides of your front and back pieces, making sure to stay within the foreseen seam allowance.
Assurez-vous d'inclure les bords de la doublure et du sac de poche, car cela empêchera les choses de se déplacer lorsque nous couvrirons les coutures latérales.
Étape 14: Coudre les coutures latérales

Place the front and back of each leg on top of each other, with the good sides together.
Align the side seam, more precisely the side seam on the outside, where there is no crotch curve.
You can pin the pieces together to make sure things stay in place while sewing this lengthy seam.
Sew the seam, starting from the waistband along the entire side of your trousers.
Étape 15 : Appuyez sur la marge de couture ouverte
Press open the seam allowance along the side seams. Do so from the back, and repeat from the good side of the fabric.
Take your time, making sure to use enough heat, but not too much. Use steam or spray on water for best effect.
Une belle couture de côté plat a l'air superbe, alors prenez votre temps pour la régler.
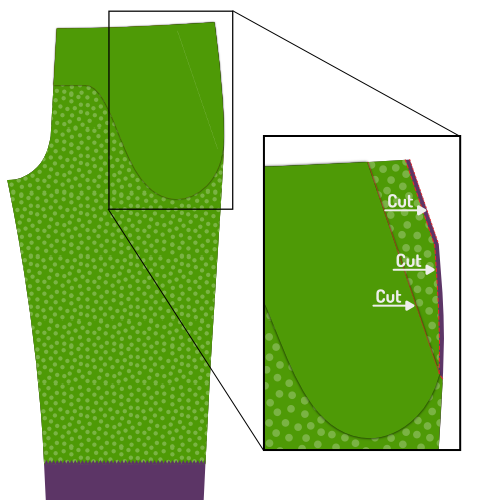
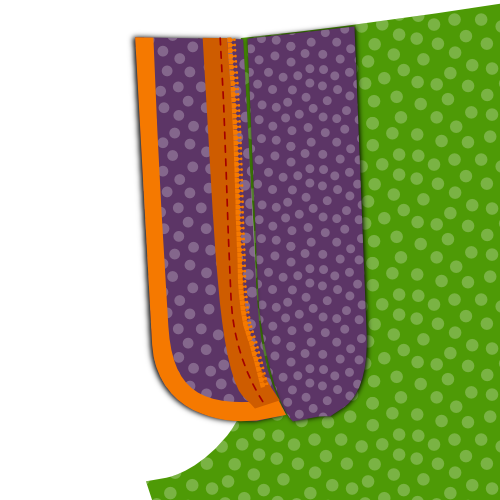
Étape 16 : Coudre le bouclier de la mouche en pièce de mouche

Place your fly piece on the fly shield with the good sides together, and align the edge with the biggest curve.
Sew along the curved edge, taking account the standard 1cm seam allowance, to join the two pieces together.
Si votre doublure contient un étirement quelconque, essayez de l'étirer un peu pendant que vous coudez la courbe. Il sera ainsi plus facile de mettre la doublure à plat sans rides plus tard.
Étape 17 : Appuyez sur le bouclier de la mouche

Avant d’appuyer sur votre mouche, assurez-vous de rouler un peu la couture afin que votre doublure de pantalon s’assied un peu plus loin, et la doublure ne démarre qu'à environ 2mm du bord. Cela empêchera la doublure de se dessiner sur le bord.
After you have sewed fly piece and fly shield together, turn them inside out and press the seam you just made.
Étape 18: Épingler le zip vers le devant droit
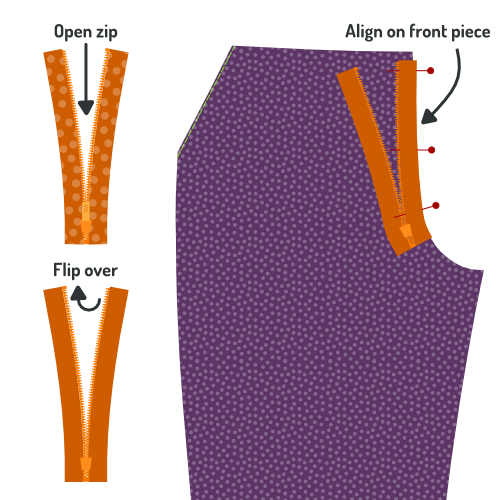
Les étapes 18 à 21 mènent tous à une seule rangée de coutures qui va coudre votre zip à l'avant, tout en attachant la pièce de mouche et le bouclier de mouche en une seule fois.
C'est la couture la plus difficile à faire dans tout le processus de construction, donc je prends mon temps pour expliquer et illustrer cela avant de commencer à coudre.
Place your front piece for the right leg with the good side up. So that lining and front pocket bag sit underneath and lie flat.
Take your zip and open it (unzip it). Now turn it over so that it sits with the good side down. In other words, with the zipper puller down.
Align your zip with the crotch seam as shown in the illustration. Take the following into account:
- La fin de votre glissière devrait se poser au sommet de votre pantalon où commencera votre ceinture. Cependant, n'oubliez pas qu'il y a une marge de couture là-bas, ne l'alignez donc pas avec le haut de la pièce avant, mais soustrayez une marge de couture de 1 cm.
- Alignez le zip avec la couture crochée. Ne vous inquiétez pas le bord de la zip, comme ils viennent en différentes largeurs. Au lieu de cela, assurez-vous que vous pouvez coudre à côté des dents de la glissière dans la couture de la pièce avant.
Pin the zip in place with a few pins perpendicular to your zip (as shown). In other words, don't pin along the zip, but across the zip.
Si vous n'êtes pas sûr de l'emplacement de votre zip, mettez-la aussi près que possible du bord. Le fait de le faire signifie seulement que votre zip est un peu plus loin sous la volée, de sorte qu'il n'est certainement pas en spectacle.
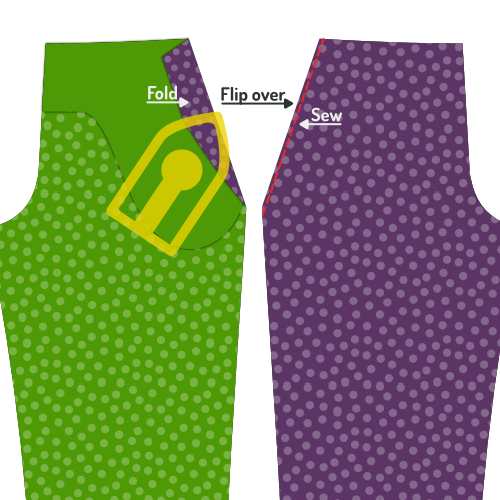
Étape 19: Épingler le bouclier de la mouche pour zipper

Take the fly shield/fly piece that you assembled in step 16 & 17, and place it with the fabric facing downward, and the lining upward.
Flip aside the top lining layer, and align the slightly curved edge of the fabric (where it is not sewn to the lining) with the edge of the fabric of your front piece.
Pour plus de clarté, quel côté du bouclier de la mouche qui doit être orienté vers le haut est affiché dans la partie supérieure de l'illustration, à une échelle plus petite.
Pin this layer in place with a few pins perpendicular to your zip (as shown in red). Make sure you catch all layers underneath, including the zip. This way, you can remove your pins from the step before (shown in green) when done.
Si vous êtes à l'aise de tenir tout cela en place, vous pouvez laisser la doublure tomber et épingler tout ensemble comme indiqué à l'étape suivante. C'est un peu plus rapide, mais plus sujet aux erreurs car les choses peuvent se déplacer plus facilement.
Étape 20 : Épingler le bouclier de la mouche le long du zip

Let the lining fall back in place, and now pin all layers together along the zip.
When you are done, remove your earlier perpendicular pins.
Étape 21 : Plier sur le bouclier de la mouche et épingler vers le bas


Flip everything over so that your fly shield lies at the bottom.
Fold the lining of the fly shield around the fly, front piece and fly piece, making sure to double-fold it so the raw edge is hidden inside.
Pin this down, and remove your previous pins.
Étape 22: Coudre la mouche en place le long du zip
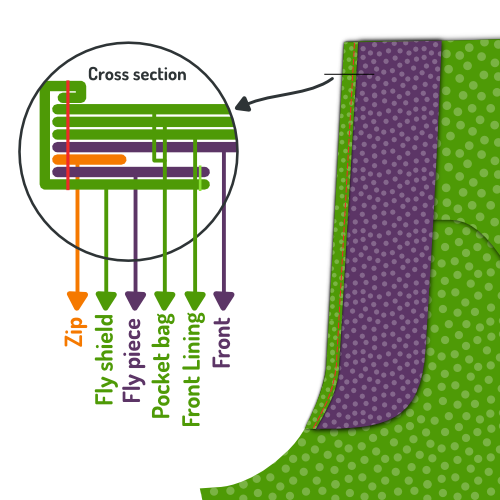
Now you can sew along the double folded fly piece. This will fix the front, zip, fly shield and fly piece all in place.
Vous allez coudre le long de votre zip, alors assurez-vous d'installer votre pied zippé.
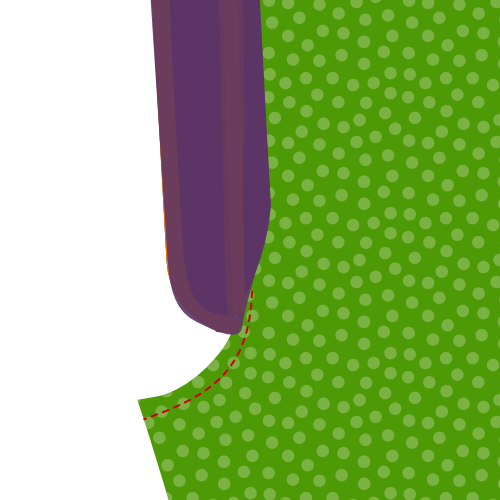
Étape 23 : Pliez la mouche arrière et appuyez sur

When you're done, fold back the fly so that it extends from the front piece, and give it a thorough press from the back. And a gentle press from the front.
Étape 24 : Appliquez du ruban de biais sur la deuxième pièce de vol et appuyez sur

Apply bias tape to the edge with the large curve of your second fly piece.
Press the finished edge flat when you're done.
Bias ruban est une façon de finir une couture. Si vous n'êtes pas sûr de ce qu'il est ou de la manière de l'appliquer, faites-le moi savoir.
Étape 25 : Épingler et coudre la mouche pour coudre la couture

Place the left leg with the good side up. Place the second fly piece on top with the good side down, aligning the unfinished seam with the crotch seam.
Pin the fly piece in place, then sew it in place along the crotch seam.
Lorsque vous courez cela en place, assurez-vous d'attraper la ligne avant.
Press the finished edge flat when you're done.
Étape 26 : Roulez la mouche au dos et appuyez sur la couture

Fold the fly piece to the back. Before you press, make sure to roll the seam a bit backwards so that the front of the trousers sits a little further than the fly piece.
This way, the seam or fly piece will not show from the front.
Give it a good press from the back.
Étape 27: Épingler et coudre le zip à la pièce de vol


Place the right leg down with the good side up. Place the leg on top of it with the good side down.
With the crotch seams aligned, pin the zip along the edge of the fly piece with the good side of the zip down.
Make sure to pin the fly only to the fly piece. Not to any other layers underneath.
Je trouve plus facile d'épingler le zip à travers toutes les couches, puis lorsque la sécurité est en place, ajoutez des épingles supplémentaires qui l'épinglent à la pièce de mouche seulement. Quand c'est fait, vous pouvez enlever les broches qui passent par tous les calques.
Last but not least, sew along the zip with your zipper foot to attach it to the fly piece.
When aligning the zip, make sure to take the following into account:
- The zip should be placed with the good side down
- The zip should sit a bit back from the edge of your fly piece
- Make sure to align the top of the zip with the other zip half on the right leg
Étape 28 : Zig-zag le bord zip à la pièce de la mouche

With the fly in place, run a zig-zag stitch along the edge of the zip to secure it to the fly piece.
Étape 29 : Tape à barres les deux morceaux de mouche ensemble

Place both fly pieces together, and move the front pieces out of the way.
Use a bar-tack to join them together at the bottom of the zip. Sew on both edges of the zip, and get as close to the zip as you can.
Si votre zip est trop long, vous pouvez le couper en dessous de la barre.
Étape 30: Joindre la couture de crotch

Place both fronts with the good sides up. They are now joined by the fly.
Make sure the fly is neatly tucked under, and pin together both fronts at the bottom of the fly, where you bar-tacked earlier. Make sure the pin is aligned to the fold of your front.
Fold the fronts with the good sides together, and pin them together along the crotch.
You'll need to get the fly shields out of the way, so if you've pinned through all layers before, remove that pin now, making sure to replace it with a horizontal pin. This will tell you how far to sew.
Sew the crotch seam, starting at the cross-seam point, and going up to your horizontal pin.
Je trouve cette étape difficile à expliquer, et difficile à illustrer. J'espère que cela aura un sens quand vous regardez votre mouche. Si ce n'est pas le cas, consultez les instructions de la vidéo.
Étape 31: Feuille d'épingle fermée et courbe de baste

Close the fly, and pin the fronts together making sure the fly is neatly tucked away.
We will be topstitching the fly curve next, and it's a good idea to baste it first.
You should start a bit above your earlier bar tack, and make sure you catch only the fly shield of the left leg.
Curve upwards toward the edge of the fly shield, and then proceed in parallel with the zip.
Étape 32: Couper la courbe de la mouche
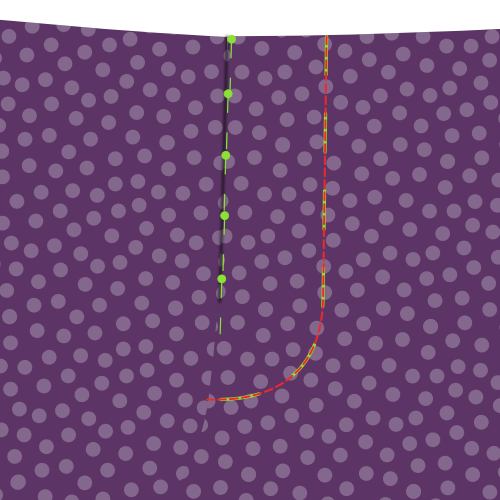
Now topstitch your fly curve, using your basting as a guide.
When doing so, you will be locking your front, fly piece, pocket bag and lining all together.
Étape 33: Épinglez ensemble la couture intérieure de la jambe

Close the legs with the good sides together, and pin together the inner leg seam. Start at the cross seam point and work your way to the bottom of the legs.
Make sure to do this for both legs.
Étape 34 : Coudre les coutures internes de la jambe

On both legs, sew the inner leg seams that you just pinned. Make sure to respect the seam allowance.
Étape 35 : Appuyez sur la couture ouverte de la couture intérieure des jambes

Place your leg inside-out on your ironing board, and press open the seam allowance of the inner leg seam.
Étape 36: Fermer la couture croisée

We are now going to close the cross-seam, from the bottom of your fly between your legs, up your bum to the center back of where you'll add the waistband later.
To do so, turn on of the legs inside out, so that that good side of the fabric is turned inside, and the bad side and lining sits on the outside.
The other leg should not be turned inside-out, but should just have its good side on the outside.
Now, put the leg that has the good side out (the normal leg) into the leg that has the bad side out (the inside-out leg).
This way, the good sides of both legs will sit against each other, and this is how you should sew the cross seam.
Faites attention à ce que votre jambe ne soit pas tordue à l'intérieur de l'autre jambe. En cas de doute, tournez à nouveau la jambe extérieure après avoir épinglé la couture de croix pour vous assurer que tout va bien.
Pin the cross-seam in place, and then sew it close, starting at the side of the fly, and making sure to respect the seam allowance.
When done, press the seam allowance open.
Étape 37: Appuyez sur le pli des jambes en place

Turn your trousers good side out, and carefully place one leg on your ironing board so that it lies flat and folds exactly on the crease line your basted earlier.
When it's looking good, press the crease lines in your leg, front a back. Repeat for the other leg.
Give it a firm press because you want the pleats to still be there after you wash your trousers (so you can see where to press them again).
Dans l'industrie, les produits chimiques sont appliqués le long de la ligne de pli avant d'être pressés ensemble. Certains tailleurs utilisent une sorte de marteau et d'enclume en bois pour frapper les fibres dans un creux permanent.
Depending on your fabric, your crease might last longer, but ultimately, you can't expect to have a crease that can withstand a few washes without being reapplied.
Peut-être que cela va de soi, mais il y a aussi une autre option : ne pas appuyer sur le creux. Cela donne à votre pantalon un aspect plus informel.
Étape 38 : Fusionner l'interfaçage avec la ceinture

Fuse the waistband interfacing (Piece 3) to the waistband (Piece 4).
Align the interfacing in the middle of the waistband, and make sure to keep it nicely aligned as you fuse it in place with your iron.
Étape 39 : Fermer la ceinture et la ceinture

Join the waistband (Pieces 4a and 4b) by sewing both pieces good sides together.
Join the waistband lining (Pieces 5a and 5b) by sewing both pieces good sides together.
Étape 40 : Coudre la ceinture à la ceinture
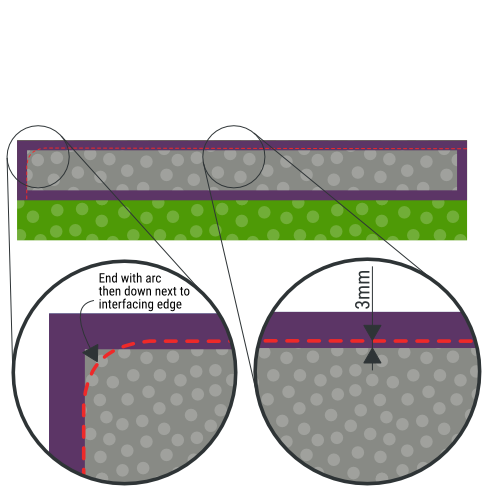
Place your waistband on the waistband lining, good sides together, so that the waistband interfacing is facing upwards.
Align the edge, and pin them together.
Nous allons coudre le long du bord de l'interface, mais nous couvrirons environ 3mm ou 1/8 de pouce à partir du bord de l'interface. Cela empêchera que la doublure soit visible à l'avant plus tard.
On one side of the waistband, end with a curve and then go down vertically along the edge of the waistband interfacing. Check the illustration to make sure you do it on the correct side.
Étape 41 : Roulez le tissu autour du bord d'interfaçage et appuyez sur la ceinture
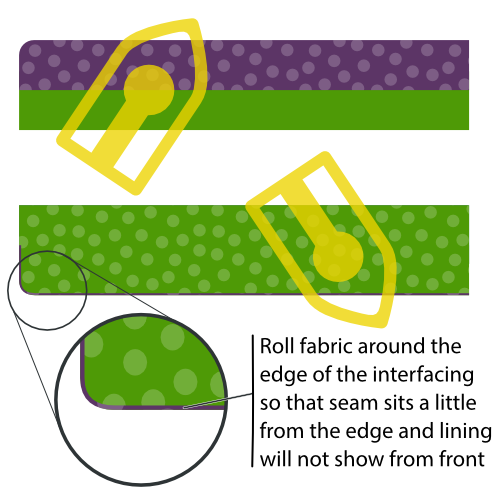
Before pressing the waistband, make sure to roll over the fabric around the edge of the interfacing.
Remember that in the previous step your sewed 3mm from the interfacing edge? You need to make the fold around the edge of the interfacing so that the actual seam sits 3mm more inwards.
This will make sure that our lining fabric is never on display from the front of your trousers.
Étape 42: Épingler la taille de la taille au pantalon
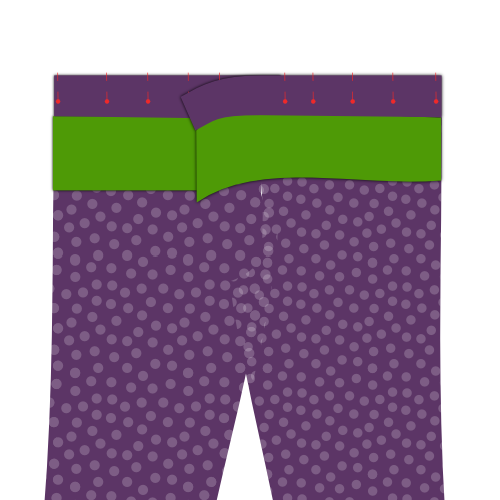
Pin the edge of your waistband (the side you did not sew the lining to) to the top of your trousers, good sides together.
Tuck the edge of your fly into the end of the waistband with the curved corner. On the other end of the waistband, it will be longer. In other words, your waistband will overlap here.
Veillez à faire correspondre l'alignement vertical de la ceinture à la fermeture zippée. Lorsque le zip est fermé, les deux côtés de la ceinture doivent s'asseoir à une hauteur égale. C'est facile à rater si vous ne le vérifiez pas.
Étape 43 : Coudre la ceinture au pantalon

Now that the waistband is pinned to top of your trousers, sew it in place.
On the side with the curved corner, get as close to the edge as possible. On the other side, stop when you reach the edge of your fly.
Étape 44 : Appuyez sur la ceinture

Give your newly sewn seam a good press. Do not press the seam open, instead press it towards the top (put both trousers and waistband seam allowance in the waistband).
Étape 45 : Préparez les boucles de ceinture

The belt loops are a part of your trousers where you can let your creativity run free. There's load of different ways to make and shape belt loops, not to mention that where you place them is also up to you.
That being said, here's what to do to make a standard belt loop:
Find the belt loop pattern part, a small rectangular piece of fabric. There should be 8 of them, and these will become your belt loops. For each of them, take these steps:
- Zig-zag (ou serge) le long des bords les plus longs du rectangle
- Replier un côté sur la longueur et appuyer sur
- Plier le dos de l'autre côté le long de la longueur et appuyer sur
- Coudre à la main le long de la boucle de la ceinture pour que les côtés pliés restent en place, mais les points ne s'affichent pas à l'avant
- Donnez-lui une dernière bonne pression lorsque vous avez terminé
Même si la largeur des boucles de votre ceinture n'est pas si importante, il importe de s'assurer qu'elles sont toutes de la même largeur.
Pour faciliter l'obtention d'une largeur uniforme, vous pouvez plier vos boucles de ceinture autour d'une bande de carton, papier épais, ou plastique de la boucle de courroie désirée.
Cette bande peut également vous aider à coudre à la main. Gardez-le dans la boucle de votre ceinture et il empêchera votre aiguille de percer à travers toutes les couches et votre fil ne se montrera pas à l'avant.
Étape 46 : Attachez les boucles de ceinture : Bas

Attach the bottom of the belt loops to your trousers. Place them about 1.5 cm below your waistband, depending on your waistband width.
Place the good side of the belt loop down on the good side of the trousers (good sides together) and secure with a bar tack or narrow zig-zag.
Then, zig zag the edge of the belt loop to the trousers.
Il est important de faire sortir la ceinture de la taille tout en faisant ceci. Assurez-vous d’attacher les boucles de ceinture uniquement à votre pantalon, et non à la bande de taille.
Vous avez 8 boucles de ceinture, donc vous devez les répartir autour de votre ceinture. Jetez un coup d'œil à une paire existante si vous ne savez pas comment procéder.
Assurez-vous de placer des cerceaux de ceinture à proximité du dos central, et pas trop près les uns des autres à l'avant (pour les boucles de ceinture).
Étape 47 : Visage de la ceinture

The waistband facing needs to be cut out and attached to your waistband.
This will be a lot simpler to understand if you have a look at the relevant video:
Étape 48 : Ajuster la marge de couture de la taille

Before we finalize the waistband, we're going to trim back some of its seam allowance.
About seam allowance grading When trimming back different layers of seam allowance, always try to cut them at different lengths so that the bulk is reduced in incremental steps.
La couche la plus proche du bon côté du vêtement devrait être la plus longue, donc couper de là.
Ce faisant, il sera moins probable que le contour de la marge de couture soit visible du bon côté.
Étape 49: Appuyez et badigeonnez la doublure de ceinture

The waistband lining will be sewn from the front of the trousers on top of the seam that joins the waistband to the trousers (so called stitch in the ditch).
Doing so will catch the lining and secure it in place. However, since we'll be sewing this from the good side, the lining will lie beneath all other layers, and we won't see what we're doing.
That is why, to make sure it all lies clean and flat, we will first press and baste the lining.
The lining will extend downward from the top, and it needs to be folded back up under itself, so that it will get caught by the seam when we sew it in place later.
To make sure things look pretty, the distance between the top of our waistband and the (folded back) bottom edge of our lining should be constant. You can mark an even distance from the top of your trousers, and then pin back the lining at this line. Last but not least, press that fold in your lining.
When you're happy with how it looks, baste the lining in place just next to the seam joining the waistband and trousers.
Il est préférable de badigeonner à côté de la couture, et pas vraiment dans la couture. Cela facilitera grandement la suppression de votre bâton quand nous aurons cousu dans la dernière étape.
Étape 50: Coudre la doublure de ceinture en place
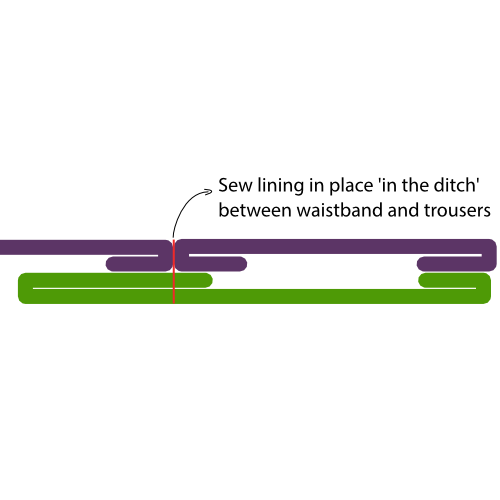
After you basted the waistband lining, sew it in place from the good side, exactly in the seam between the waistband and trousers.
Étape 51 : Attacher la boucle de la ceinture : Haut

With your waistband and lining properly secured, it's time to attach the top of the belt loops.
Sew them in place just as you did at the bottom. That is, use a bar tack or close zig-zag to attach them, then zig-zag over the end to secure it.
Ne pas coudre à travers le haut des boucles de ceinture. Tu devras travailler le pied de ta machine à coudre sous la boucle de la courroie de sorte que tu ne couses que la pièce qui est pliée en arrière.
N’hésitez pas à couper la longueur des boucles de votre ceinture après avoir appuyé sur votre barre et avant de zig-zag la fin de celles-ci, car ils pourraient être trop longs.
Étape 52: Terminer le bord des jambes
Before we hem the trousers, finish the raw edge of the legs with a zig-zag stitch or serger.
Ce serait également un bon moment pour essayer votre pantalon et marquer exactement combien de temps vous voulez qu'il soit après qu'ils soient enserrés.
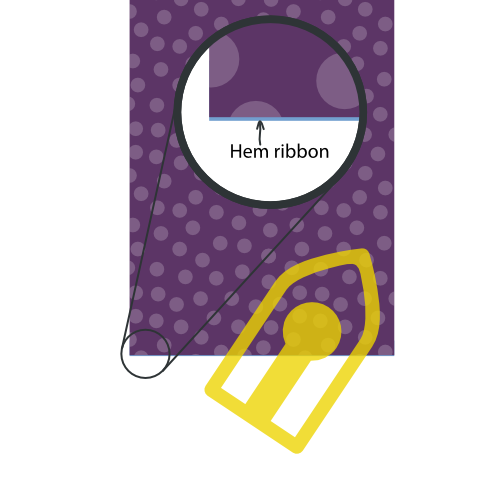
Étape 53: (Optionnel) Coudre dans un ruban d'ourlet

L'ourlet est un ruban qui se trouve à l'intérieur de votre pantalon. À l'endroit où votre ourlet se replie, le tissu doit prendre beaucoup d'abus de bosser dans des chaussures et d'autres choses.
Placer un ruban à l'intérieur de l'ourlet protège votre tissu dans une certaine mesure, et c'est une finition soignée.
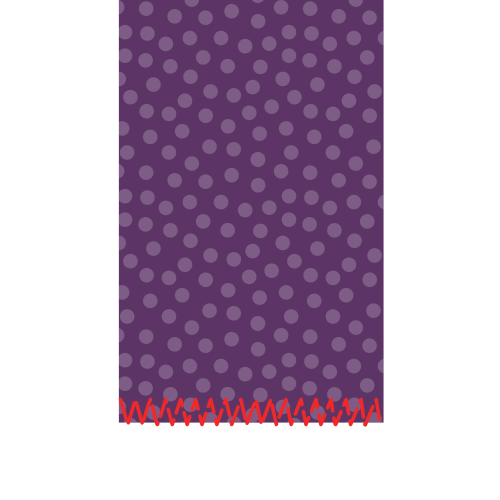
Mark the hemline on your trousers (good side out).
Place the ribbon as shown in the illustration making sure that it extends a few mm above the hemline. Sew it in place all the way around the leg, making sure to sew close but not on the hemline.
Étape 54 : Appuyez sur l'ourlet
Fold back the trouser legs at the hemline, and press the hem.
Si vous avez cousu dans un ruban d'ourlet, le ruban s'étendra de quelques mm en dessous de la ligne d'ourlet, protégeant ainsi le tissu à l'ourlet.
Étape 55: ourdir les jambes

With the hem neatly pressed, simply hand-sew the folded back part to the inside of your trousers.
L'emménagement se fait à la main parce qu'il est important que les points ne s'affichent pas sur le devant. So when hand-sewing the hem, don't push your needle through the fabric, but just catch a few threads so your stitches don't show on the front
While there are machine alternatives, they aren't as neat (blind hem stitch) or probably not accessible to the home-sewer (industrial blind hem machine).
Étape 56 : Couper, nettoyer et appuyer sur
Trim any loose threads or basting that remains, and give your trousers a good final press.